

Prerequisites
In order to connect Cube to Snowflake, you need to grant certain permissions to the Snowflake role
used by Cube. Cube requires the role to have
USAGE on databases and schemas
and SELECT on tables. An example configuration:- Account/Server URL for Snowflake.
- User name and password or an RSA private key for the Snowflake account. In Cube Cloud, you can authenticate with OIDC workload identity instead — the same role grants apply to the mapped service user.
- Optionally, the warehouse name, the user role, and the database name.
Setup
Manual
Add the following to a.env file in your Cube project:
Cube Cloud
In some cases you’ll need to allow connections from your Cube Cloud deployment
IP address to your database. You can copy the IP address from either the
Database Setup step in deployment creation, or from Settings →
Configuration in your deployment.
OIDC workload identity
Instead of a password or key pair, Cube Cloud deployments can authenticate to Snowflake with OIDC workload identity: a Snowflake External OAuth integration trusts Cube’s OIDC issuer, and the driver presents a short-lived Cube-minted JWT — no long-lived secrets to provision or rotate. Snowflake validates each connection’s token against your tenant’s public JWKS, maps the token’ssub claim to a Snowflake
user, and authorizes the session role through the token’s scp claim.
Start with the OIDC overview for the concepts (issuer,
token configs, custom claims, target env var) and to enable OIDC for your
tenant, then:
1
Create the token config
In Admin → OIDC, click Add Config and create a config with: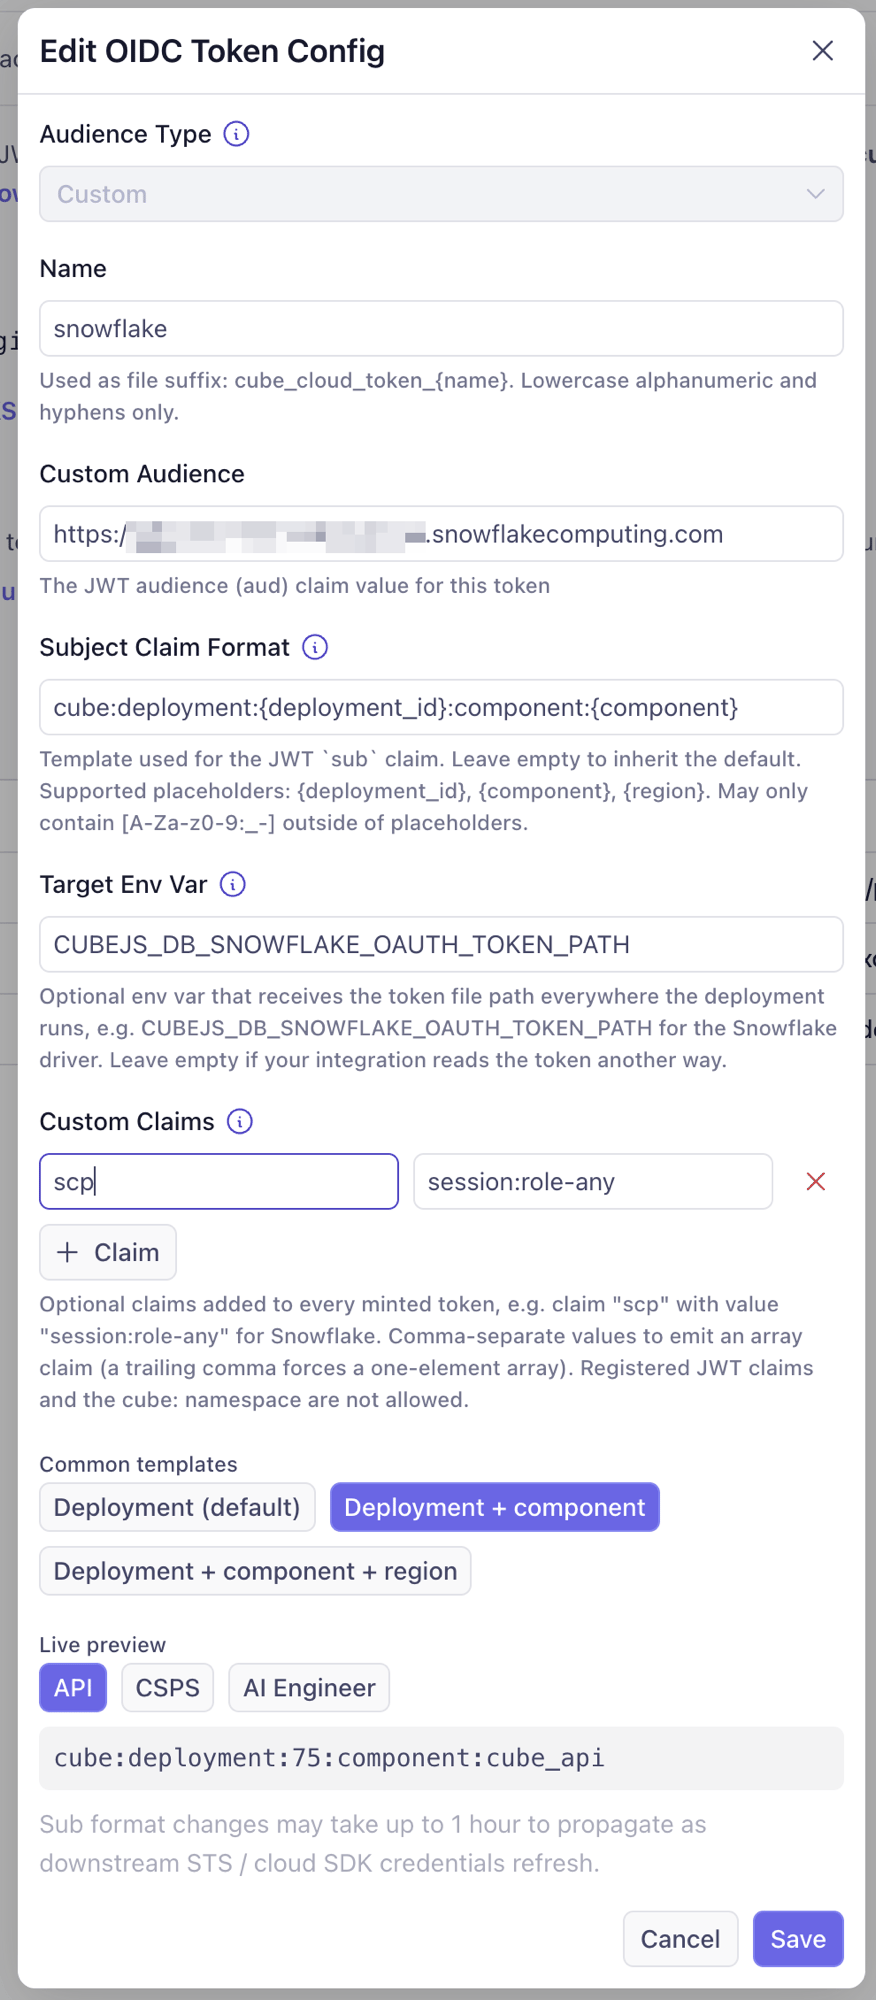
scp claim is the part that’s easy to miss: Snowflake grants
session roles exclusively through it — a token without scp
authenticates but fails role authorization. session:role-any lets the
driver request any role granted to the mapped user; to pin the role
inside the token instead, use session:role:<role-name> and
EXTERNAL_OAUTH_ANY_ROLE_MODE = 'DISABLE' below. The Target Env Var
is how the driver finds the token: Cube sets that env var to the token
file path in every execution context (deployed pods, dev mode, and test
connection each keep the file in a different place), so the path is
never written by hand.2
Create the External OAuth security integration
In a Snowflake worksheet, as The issuer and audience must match the token config exactly. Snowflake
fetches the JWKS from your tenant’s public endpoint, so no key material
changes hands.
ACCOUNTADMIN:3
Create the service user and role
The integration maps the token’s
sub claim to a Snowflake user via
LOGIN_NAME. With the default subject claim format the rendered sub
is cube:deployment:<deployment-id> — the deployment ID is the number
in your deployment’s console URL. If you chose a different template,
use the token-config dialog’s live preview to see the exact rendered
value.TYPE = SERVICE blocks password logins for this user entirely — it
can only authenticate through the federation.4
Configure the deployment
Set the
OAUTH authenticator and omit CUBEJS_DB_USER /
CUBEJS_DB_PASS:CUBEJS_DB_SNOWFLAKE_OAUTH_TOKEN_PATH is not set here — Cube
populates it automatically thanks to the Target Env Var from the
token config. The driver re-reads the file on every new connection, so
the broker’s automatic refresh is picked up without restarts.OAUTH_ACCESS_TOKEN as the authentication factor:
Cube Cloud also supports connecting to data sources within private VPCs
if single-tenant infrastructure is used. Check out the
VPC connectivity guide for details.
Environment Variables
1 Required when using password-based authentication. Not required with
SNOWFLAKE_JWT (key pair) or with OAUTH — including OIDC workload identity in Cube Cloud, where the driver reads a Cube-minted token from CUBEJS_DB_SNOWFLAKE_OAUTH_TOKEN_PATH.
Pre-Aggregation Feature Support
count_distinct_approx
Measures of typecount_distinct_approx can
be used in pre-aggregations when using Snowflake as a source database. To learn
more about Snowflake’s support for approximate aggregate functions, click
here.
Pre-Aggregation Build Strategies
To learn more about pre-aggregation build strategies, head
here.
By default, Snowflake uses batching to build
pre-aggregations.
Batching
No extra configuration is required to configure batching for Snowflake.Export Bucket
Snowflake supports using both AWS S3 and Google Cloud Storage for export bucket functionality.AWS S3
Ensure proper IAM privileges are configured for S3 bucket reads and writes, using either
storage integration or user credentials for Snowflake and either IAM roles/IRSA or user
credentials for Cube Store, with mixed configurations supported.
Google Cloud Storage
When using an export bucket, remember to assign the Storage Object Admin
role to your Google Cloud credentials (
CUBEJS_DB_EXPORT_GCS_CREDENTIALS).gcs_int from the example link) as you’ll need it to configure Cube.
Once the Snowflake integration is set up, configure Cube using the following:
Azure
To use Azure Blob Storage as an export bucket, follow the guide on using a Snowflake storage integration (Option 1). Take note of the integration name (azure_int from the example link)
as you’ll need it to configure Cube.
Retrieve the storage account access key from your Azure
account.
Once the Snowflake integration is set up, configure Cube using the following: